There are “travel router” products that connect to unknown networks (e.g. public Wi-Fi, hotel networks) and provide a protective layer between your personal devices and the public network. They offer additional security (e.g. firewall, VPN), allow multiple devices to share the same WAN connection while appearing as a single device, and make connecting to new networks more seamless — especially when dealing with multiple devices or non-configurable ones (e.g. gaming consoles).
However, this functionality can be easily replicated using a Raspberry Pi. On top of that, you can implement extra customization and additional features tailored to your exact needs. So I used a Raspberry Pi 4 I had lying around to create such a device.
Tools needed:
- Raspberry Pi (I used a Raspberry Pi 4, but older models work as well)
- MicroSD card (I used a 16 GB one)
- Power supply (Raspberry Pi 4 requires 5V/3A, although my usage never exceeded 1.5 A)
- Extra USB Wi-Fi adapter (the second Wi-Fi interface; wlan0 is the onboard one)
- Raspberry Pi enclosure
- Micro-HDMI to HDMI cable (for streaming content to, for example, a hotel TV)
Features:
- Ability to connect to a WAN via Wi-Fi or Ethernet
- NAT over Wi-Fi for all devices
- Customizable static IP assignments
- AdGuard DNS blocker
- VPN capability
- Speedtest functionality
- Captive portal detection
- Ability to stream content via AirPlay
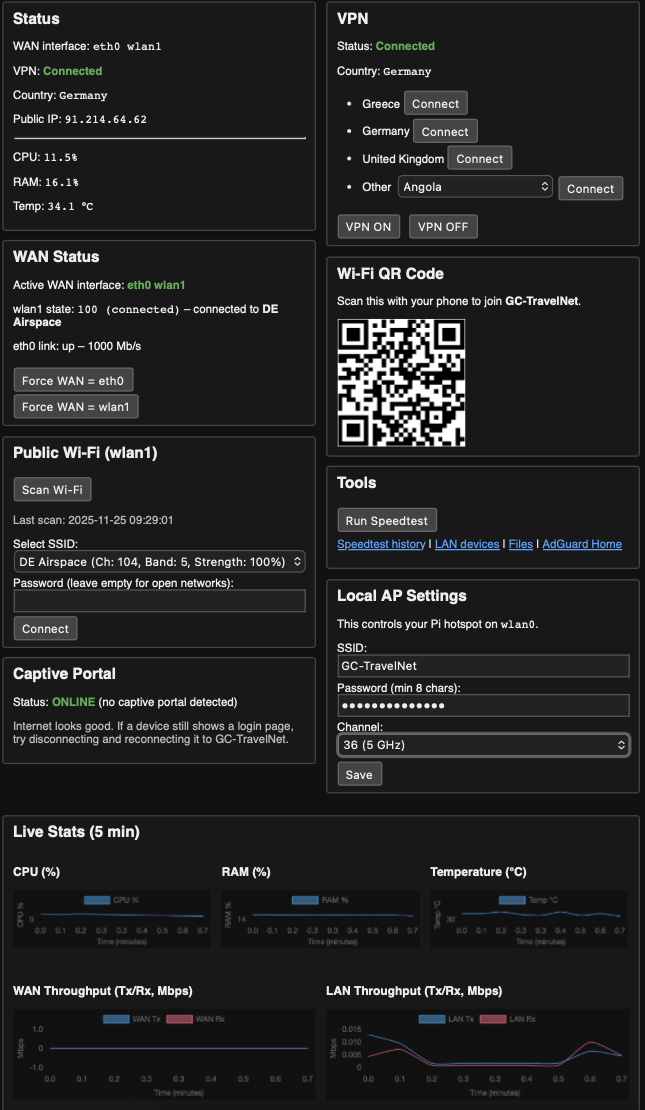
- Web portal to display router status and configure settings
- QR code for quickly joining the LAN
- Internal system and usage statistics
Steps taken to build this setup:
- Base system setup
- Flash Raspberry Pi OS Lite
- Install essential packages (network-manager, dnsmasq, hostapd, iptables, python)
- Networking architecture
- wlan0 (onboard Wi-Fi): Access point for all LAN devices
- wlan1 (USB Wi-Fi adapter): Connects to public Wi-Fi (WAN)
- eth0 (Ethernet): Optional second WAN interface
- Configuration steps
- Configure access point (hostapd)
- Configure NAT and firewall rules
- Configure VPN
- Build a custom web portal using Flask to control key functions without SSH
- Add a file-sharing portal (for quickly transferring files to connected devices)
- Install and configure AdGuard Home
- Install and configure Airplay